Thursday, February 28, 2013

Homemade Vanilla Extract

O.K. I'm about to get super complicated on ya'll right now.  Here we go . . .
Go to Costco and get yourself a pack of these.  You can order on Amazon for cheaper but I'm far to impatient for that.
Open up the package and pull out all of those sticky, heavenly smelling beans.  Take a knife and run it down each bean exposing all those perfect little seeds.
Then take a bottle of Vodka . . . I went for the cheapest stuff I could find at Target . . . empty a little bit of the vodka out of the bottle . . . and then cram all of those suckers in the bottle.  Now here is where it gets really complicated.  Put the lid on and stick it in the back of your panty.  Whew!  That was tough!
 Every so often you can go in and give it a good shake, but don't use it yet.  Give it at least a good 2 months for it to look like this.  Mmm...perfection! 
 Now if you are feeling generous go to Hobby Lobby and buy these little bottles (when they are 50% off of course), and give to friends and family.
 This stuff is AWESOME!! Next I want to try Mexican vanilla beans.  I think it will give it a whole different flavor and I can't wait to try it!  
So to sum it up here's what you need:
1 bottle of vodka
10 vanilla beans
time (a good 2 months or longer)
Tip: If you use vanilla beans in your baking you can take the scraped out beans and toss them in your bottle to intensify the flavor and then continue topping off your bottle with new vodka to keep your supply going.


Wednesday, February 27, 2013

Homemade Laundry Detergent

So I have had homemade laundry detergent sitting on my Pinterest board for a long time and I finally decided to give it a go.  All I can say is why have I waited for so long!!! I can't believe I have been waisting so much money.  This is so economical and it works just as well!  Here's what I did.  I grated about a 1/3 of a Fels Naptha bar.  This is way easier than I thought it was going to be.  I also grated about a 1/3 of a bar of good smelling soap purely for the scent of it.

 I thought grating the soap was going to take a long time so I set my son up with a movie and took a seat with my grater, bowl and soap and started grating.  Thank heavens it went faster than I thought!
 
 Next I added the soap gratings and six cups of water to a large pot.  I turned the heat on to medium-high and heated it until all the soap gratings had melted.
 Once all the gratings were melted I added 1/2 cup of borax and 1/2 cup washing soda to the pot and mixed it thoroughly.  I had an empty larger sized laundry bottle that I saved and a large Costco juice jug that I cleaned out and used those as my containers.  I divided the mixture between the two jugs and then filled the rest with water.  I also added a few drops of wild orange essential oils.  Once everything was in the jugs I sealed them well and then gave them a good shaking.  Then I let them sit.  Occasionally I would go and give them another shaking throughout the day, but I gave it a good 24 hours before I used it.  
I think this stuff works great! It is a little chunky(i know that sounds gross), but if you can get past that it's totally worth it!   I use about 1/4 - 1/2 cup depending on my load size and I use it in a HE washer and haven't had any issues! Totally recommend this stuff!
So here's the recipe
1/3 bar Fels Naptha bar- grated
1/3 bar good smelling bar soap - grated 
1/2 cup washing soda
1/2 cup borax
essential oil of choice - optional

I have a friend that uses a large bucket instead of the individual containers so that is an option as well.  You can find her over at http://theeverydayhomeschool.blogspot.com

Tuesday, February 26, 2013

Homeschool Conversations

While at the YMCA tonight Honey had this following conversation with some new friends at Zumbatomic. 
Friend: "What grade are you in?"
Honey: "4th grade"
Friend: "What school do you go to?"
Honey: "I homeschool"
Friend: "So you stay at home and do nothing!"
Honey: "Um, No! I home SCHOOL!"
Friend: "Oh."
A second friend approaches and overhears their conversation and this is how it went.
2nd friend: "You homeschool?!:
Honey: "Yes."
2nd friend: "I'm so sorry for you!"
Honey: "Why?!"
2nd friend: "Cause you don't get to be with your friends all day!  Don't you hate that?"
Honey: "Um... NO!!  I do my school work for a couple hours and then I get to play ALL day long with my sisters and brother and homeschool friends!  Homeschool ROCKS!!!"

Mmmm....music to a homeschooling moms ears!  LOVE IT!!!  Homeschool does rock!  Well . . . most days! :)

Monday, February 25, 2013

Cooking Class Part 4

Our most recent cooking lesson was on setting the table properly, table manners and they made a recipe all by themselves . . . pancakes.  Recipe to follow.  Just ignore the mug in the bowl in the picture below.  I'm not sure how that ended up like that . . . Piglet maybe . . . but it was perfect at one point, I promise.  Here's the link I used for a coloring page for an informal setting.
Here's a link to a more formal setting
 The kids were so cute about the "fancy" table setting.  They talked very proper like and it was a lot of fun.  Before they could eat we went through a list of proper table manners.  I was sad my son was not here for this portion of the lesson cause he could definitely use some reminders.  I think I see a future Family Home Evening lesson in the works.
 And look at this. Napkins on their laps and elbows off the table.  What proper young ladies they are.
Pancakes
1 cup white flour
1 cup wheat flour
1/2 tablespoon sugar
1/2 teaspoon salt
4 teaspoons baking powder
2 cups milk
2 eggs
4 tablespoons oil

Start heating nonstick griddle to 350-400 degrees.  Combine all dry ingredients in large bowl and combine with wisk.  In separate bowl combine milk, eggs, and oil.  Add wet ingredients to dry ingredients and mix until just combined.  Do not over mix.  A few lumps are o.k.   Spray griddle with nonstick spray.  Using a 1/4 - 1/3 cup measuring cup, depending on the size of pancakes you want, pour batter onto griddle leaving about and inch in between each pancake.  When pancakes start to dry slightly around the edges and bubbles start to form in the center flip the pancake using a spatula.  Cook for another couple minutes until underneath side is golden brown then remove to a plate and continue the same method with the rest of the batter.  

Sunday, February 24, 2013

Cooking Class Part 3

This lesson was ALL about eggs!  Cracking, separating, whipping, scrambling, boiling . . . you name it, we talked about it!  First off we made omelette's in a bag.  They cracked the eggs themselves, scrambled them and then put them in a bag.  They added various toppings of their choosing and then sealed it up.
Into the boiling water they went.  I promise the water is boiling.  For some reason the camera didn't capture the boil.  Hmm... interesting!
 Here it is all cooked and ready to come out of the bag.
And here is the omelette ready to be eaten.
 On a side note, when serving eggs to kids make sure you have plenty of ketchup.  I might have forgotten we were pretty much all out of ketchup upon serving the eggs and the girls probably got an 1/8 of a teaspoon of ketchup each.  No joke . . . an eighth of a teaspoon!  And even that might be more than what they actually received!  Sad day on the ketchup front!
We also learned what happens to egg whites when air is added by beating them really fast.  Thanks to a fellow homeschool friend who gave the suggestion to do this part of the egg unit.  It turned out so well! You can find her awesome homeschool blog here http://theeverydayhomeschool.blogspot.com
We made these little meringue cookies.  The recipe for these and the omelets will follow.
 We also learned about melting chocolate and decided to dip our cookies in said melted chocolate.  Yum!  Here are pics of each of the girls giving cookie dipping a go.


 And here is Piglet, again, tasting our tasty treats.  I don't think she actually ate the cookies.  I'm pretty sure she just used her fingers to dip and lick off all of the chocolate.  What can I say?!  A girl after my own heart!
 These are pretty much marshmallow cookies dipped in chocolate.  How can this go wrong . . .
 It can't!
 Check out these cute chocolate faces!  Its a good thing our lesson on manners and etiquette is the next lesson cause I'm pretty sure after these cookies it would have been an epic fail.  But so worth it!  And fun!
Omelette in a Bag
2 eggs 

2 slices ham, chopped (optional)
1/2 cup shredded Cheddar cheese 

1 tablespoon chopped onion (optional) 
1 tablespoon chopped green bell pepper (optional) 
2 tablespoons chopped fresh tomato (optional) 
1 tablespoon chunky salsa (optional) 
2 fresh mushrooms, sliced (optional) 
Directions
  1. Crack the eggs into a large resealable freezer bag. Press out most of the air, and seal. Shake or squeeze to beat the eggs. Open the bag, and add the ham, cheese, onion, green pepper, tomato, salsa, and mushrooms. Squeeze out as much of the air as you can, and seal the bag.
  2. Bring a large pot of water to a boil. Place up to 8 bags at a time into the boiling water. Cook for exactly 13 minutes. Open the bag, and let the omelet roll out onto a plate. The omelet should roll out easily.
Snow Cookies
2 egg whites
1/2 teaspoon vanilla
1/4 teaspoon cream of tartar
1/2 cup sugar
1 cup chocolate chips
1 teaspoon vegetable oil
1/2 cup peppermint candies
Directions
Separate egg whites and let stand at room temperature about 30 minutes. Preheat oven to 300 degrees. Line a baking sheet with silpat or parchment paper and set aside.
Using an electric mixer, beat vanilla, cream of tartar and egg whites till soft peaks form (tips curl).
Slowly add sugar, 1 Tablespoon at a time, beating on high speed till stiff peaks form (tips stand straight) and sugar is almost dissolved.
Spoon meringue mixture into a piping bag fitted with a large star shaped tip. Pipe 1-2-inch stars onto baking sheet.
Bake in preheated oven for about 15 minutes or until cookies just start to turn brown. Turn oven off and let cookies dry in oven with door closed for about 10 minutes. Remove cookies and cool on wire racks.
Melt chocolate and vegetable oil and place in small bowl. Crush peppermint candies in either a food processor or mini chopper and place in another small bowl.
Dip tips of snow cookies in melted chocolate. Sprinkle crushed peppermint dust on top of chocolate. Enjoy with family and friends on a fun snow day! Happy Cooking :)

Saturday, February 23, 2013

Look out!

The force is strong with this one!  Look out!  You've been warned!


Friday, February 22, 2013

Cooking Class Part 2

Here is our first cooking class.  All of the girls aprons are hung up and there recipe books laid out on the table.  For the recipe books I just bought those cheap plastic photo books and put there names on the cover and titled them Chef in Training.  Super simple!  Every class I add the recipes we are going to make for the day and then when we are done with all the classes they'll get to take them home.
What a cute bunch of girls!
 Our first class we learned all about safety and sanitation when it comes to cooking and baking.  Here they are washing their hands . . .  very thoroughly!
We also learned about proper measuring techniques.  Here is one of the girls friends spooning flour into the measuring cup.
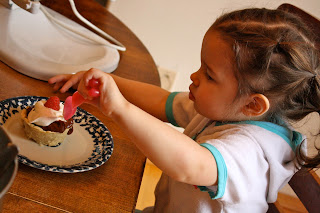
And finally tasting the food we made!  We made pudding in a cup topped with vanilla bean whipped cream and raspberries!  YUM!!!  It was soooo good!  Recipe to follow!
 Our little piglet gets to join in on our classes so she of course gets to taste EVERYTHING!
 Here is one of the desserts and the girls made them all by themselves.  How fun and what they called "fancy!"

Pudding in a Cup 
(adapted from kids-cooking-activities.com)
1 1/2 Cups flour
1/2 Cup of butter, melted
6 Tablespoons powdered sugar
1/2 teaspoon vanilla
6 teaspoons cold water
1 larger box instant chocolate pudding
The chef-in-training can do all these steps then have an adult bake in the oven. Preheat oven to 375 degrees. In a bowl add flour and powdered sugar. Mix together. Add butter and stir until mixture is crumbly. Slowly stir in cold water and vanilla. Mix thoroughly. Grease muffin tins and spread dough in each of the muffin cups. Press dough up along sides of each cup. Bake until golden brown, about 10-15 minutes. Allow to cool.  While cooling prepare instant pudding.  When dessert cups are cool, fill  with pudding and top with whipped cream and berries.
We used custard cups, but muffin cups are usually more available.
Sweetened Whipped Cream 
(adapted from our best bites)
1 c. whipping cream
1/3 c. powdered sugar
Optional: 1 teaspoon vanilla extract
and the scrapings of the inside of a vanilla bean.
Instructions:
Combine whipping cream and powdered sugar in a large bowl.  With an electric hand mixer begin beating whipping cream and sugar. As it starts to thicken add extract and vanilla bean seeds if desired. Continue beating whipping cream until soft peaks form.
Serve immediately with pie, cake, ice cream sundaes, etc.


Thursday, February 21, 2013

Cooking Class Part 1

Every other Friday we participate in a homeschool co-op swap.  Porkchop goes to Kinderboys and I keep the girls and pick up two of their friends for a cooking/baking class.  I decided we couldn't have proper cooking/baking instruction without proper attire.  And I also decided that any apron in the store wouldn't do!  A) They were to expensive and B) they weren't that cute.  So off I went to Hobby Lobby to find some fabric . . . cheap fabric.  After all, I had to make 4 of them.  I found this red and white polka dot fabric that I thought was sweet and then I found some ruffle trim that I knew I could incorporate somehow.  The flowers were at Hobby Lobby too and already had a safety pin on them so I can remove them for washing.  My mother-in-law had some old white pillowcases that she donated that I used to make the waist piece/tie.  I LOVE how they turned out and that the girls all match for their class.  Later I will post what we are learning about!  Stay tuned!

Wednesday, February 20, 2013

Meal Planning

This is what meal planning looks like for me on a Sunday night, sometimes Monday if I forget or am to lazy on Sunday.  What does your meal planning look like?

Tuesday, February 19, 2013

Valentines Day

Every Valentines Day I try and do a special dinner for the kids and this year was no exception.  It was pretty crazy in our house this Valentines Day so I had to simplify a bit, but I wasn't about to let this tradition go.  
Roses, m&m's sprinkled on the table, special cups that turn milk pink, valentine crayons, and red nail polish for the girls was what I could come up with this year.  And lets not forget the heart shape pizza from Papa Murphy's.
Oh, and let's not forget the straws that had mustaches or lips on them.  I thought they were cute!
And this is what it's all about.  They LOVED it!  My kids look forward to this every year and wait upstairs till everything is ready and then come down.  They are so funny about the whole thing and act surprised EVERY year.  That's what I LOVE about it!  We were lucky to share our special dinner with some cousins this year and that made it even better!

I'm pretty sure this little girl ate every m&m on the entire table and didn't touch her pizza. But it's valentines day, right?!  Chocolate comes first in my mind. And not just on Valentines Day, but ALWAYS!
For dessert we had M&M milkshakes. We used some of the Valentines m&m's so it turned the shakes pink.  
 And to fancy them up, just a little whipped cream and sprinkles.  Mmmm....


Sunday, February 17, 2013

Slideshow

Here is the slideshow I made for Carols family for her funeral.  If you want to download it and put it on a dvd the link is listed below the video.   If you don't want to do that I have burned a bunch of copies and can send them to family and friends.  Just leave me a message and I will send you one. 

Wednesday, February 13, 2013

Blogging tips