Friday, November 15, 2013

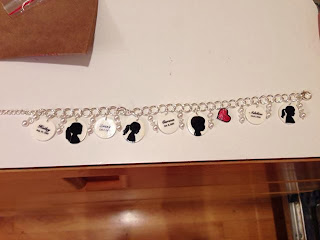
Silhouette Bracelet How To


So here is how to make the silhouette bracelet.
Run to your nearest craft store. I chose Hobby Lobby. Grab yourself some printable shrinky dink paper. Yes, you heard that right! Shrinky dink paper. It’s important to make sure you get the kind for your ink jet printer though. And don’t forget your 40% off coupon if you’re going to Hobby Lobby! J
You’ll also want to grab a bracelet from the jewelry isle. I think this one was 1.99. I went with CHEAP! You’ll also need to get some jump rings. Make sure you get open ones though otherwise you will have to be “cool” like me and have to get a wire cutter to make them open. Yes I bought closed jump rings! LAME! And if you want the little pearl separators you’ll need to get some little pin things to put your beads on. Sorry I don’t know what they are called. They have a flat head at the bottom to hold the bead in place. And if you don’t have an 1/8 inch hole punch you’ll need to grab one of those as well. I didn’t have the 1/8 inch punch so I had to go back to Hobby Lobby for a second time to grab one of those.
So now that you have all your stuff the fun begins. Take your iPhone, or heaven forbid your android or other cellular device, and take several side shots of your kiddos. This is what mine looked like.


After you get your side pictures taken you need to upload them to some sort of photo editing program. I have photoshop but ended up using this free program
Once you upload your picture you need to go to the decorate tab. This next part I felt was the hardest. You’ll have to zoom in close and trace around your image. First you will need to outline your picture in white and then fill in the background with white. Then you have to trace the inside of your image with black and fill in the inside of your child’s picture with black. Seriously, this was the hardest part. I kept having to undo my work cause my hand would slip, but a little patience got me through. Once you finish outlining and filling your picture you can save it to your computer. Oh! And I forgot to mention this program is FREE!!!  Gotta love FREE!

So once you finish your silhouette images you need to figure out how big you want them. I went through a couple batches to figure out I wanted them to be pretty small so they looked more like little charms on a charm bracelet.  I liked the idea of having their names and birthdates as a charm as well. After much trial and error, I decided I liked the size of the birthdate charms I made so I just made the silhouettes a tad bigger.
I uploaded my images to Word and sized them there.
The circles for the names were 1.5 X 1.5. I did a very light gray outline around the circles to make cutting easier.
The silhouettes were 1.2 X 1.5.
I also had to make a little template to trace around the silhouettes once they were printed out. The template was a circle/oval that was 1.5 x 1.65.

So after I did all the stuff in Word, I printed them out cut out the name circles. Then I traced the template circle very lightly around the silhouettes and then cut those out as well.
Now this next step is SUPER important! Remember that 1/8 inch punch that you needed. Get that out NOW! I may have forgotten this step once and before you knew it, it was to late! You have to do this before they bake. Punch a hole right in between the top of the dink and where the top of your silhouette head is. You need to make sure that it is not to close to the edge of the dink and not to close to the silhouette otherwise you won’t be able to get your jump ring on.

Now here is where there was a learning curve. Shrinky dinks can be very unpredictable. I found the easiest way to get around mess-ups was to preheat the oven to 275. Get 2 pizza pans. Cut a brown grocery sack to lie down on your sheet. Make sure that if there is any ink on the bag that that ink does not come in contact with your shrinky dinks.
Place your shrinky dinks about an inch apart on your brown paper bag lined pizza sheet. Then place a second sheet of brown bag over the top of your dinks. Then place the second pizza pan on top of all of that. Once your oven has heated up, put your dinks in the oven for 20 mins. That’s right! Just stick them in there and walk away. It will all be O.K.!
Once the 20 mins is up, take them out of the oven and CAREFULLY take the top pan off and CAREFULLY slide the brown bag sandwich on to your countertop and set a couple of heavy books on top for about 5 mins.
Once they have cooled a bit you can take your brown bag sandwich apart and you should, fingers crossed, have super cute little charms just waiting to be put on a bracelet.
The rest is pretty easy. You lay them out next to your bracelet and figure out your spacing. Attach a jump ring to your charm and then add it to your bracelet.
If you want the little pearl things you just and a couple beads to your “needle” things (sorry I don’t know the technical term) that you picked up earlier. Get some wire cutters and cut off the extra wire leaving about ½ inch to wrap around a ring on your bracelet.  I needed needle nose pliers to do this.
As for the little heart that’s on mine, I just took some permanent marker to the uncooked dink paper and cooked it with the rest of my charms.
Hopefully this all makes sense and feel free to ask if you have any questions!

Tuesday, July 2, 2013

Quinoa Fried Rice

WOW! It's been awhile since I posted last! And there is a reason and no it's not because I'm pregnant! I've been working on a couple of digital scrapbooks and so every evening when I would normally be blogging I was doing these scrapbooks! Hopefully I can get back on track though!
So yesterday for dinner we made fried rice, but in an effort to be healthier we changed what would have been brown rice to quinoa! And holy moly it was good! I was pretty skeptical because, I'll be honest, quinoa isn't my favorite thing.  But after tasting it, I didn't even miss the rice. And I'm a little embarrassed to even be posting this as a recipe because it's so super simple, but here I go anyways.
Here's what you need:
Prepared quinoa
 (if you don't know how to make quinoa I'll post how to make it at the end of this post.)
Diced Ham
Edamame, removed from pods
(traditionally you use peas, but I really like the edamame)
Green onion
Eggs
Low Sodium Soy Sauce
Garlic Paste (optional)
So here's what we did! We scrambled about 6 eggs, because thats all we had left. :) While the eggs were starting to cook we tossed in the ham bits. Mmmm.... HAM!!! Once the eggs were just about done we tossed in the edamame. When the eggs were done cooking we added our quinoa. We didn't use all the quinoa that we had previously cooked. We just added enough to get the look we were going for. I know that's super non descriptive, but sometimes thats how the cooking world works. Just so it looked like there was a good mix of quinoa to egg mixture. Then came the soy sauce. I HIGHLY recommend the low sodium variety. I find the real deal to be SUPER salty and then I am really puffy the next day. Who wants to be puffy?! Isn't that what we are trying to get rid of? The extra puff? :)
So again this is an eyeball thing. Add enough soy sauce to get the flavor you are going for. If you want you can add a little garlic paste to your soy sauce for a little added flavor. Before serving make sure to taste test it and be confident that it's just right! Once you've added the right amount of LOW SODIUM soy sauce. (did you catch that I think you should use low sodium soy sauce), garnish with sliced green onions. So there you have it folks! Super simple supper that is sure to please! Everyone in the house ate dinner tonight, including Porkchop! And that's saying something!

How to make quinoa in a rice cooker:
1. Using a fine mesh sieve rinse 1 cup of organic quinoa in cold water (unless it states on the box that you don't need to rinse).
2. Dump rinsed quinoa into your rice cooker.
3. Add 2 cups fresh water* see notes.
4. Turn on your rice cooker.
That's it. In about fifteen minutes* you'll have hot fluffy quinoa to play with.

Quinoa is rather bland on its own and loves flavor spikes.  So add herbs etc. My favorite thing to do is stir-fry cooked quinoa with various seasonings- herbs, garlic, spices, onion, etc. I add in fresh veggies and whatever else I might have on hand.


For those with out a rice cooker

Add the cup of rinsed organic quinoa to a saucepan; add 2 cups fresh water; bring to a boil, lower the heat to low; cover and simmer until cooked. Fluff with a fork.

Season while warm and use in salads or stuffing recipes, Store covered, in the fridge, for almost instant meals. Use within three days for best taste.


Notes about cooking quinoa 
Start with 2 cups water in a rice cooker. At higher altitudes, use  more water-- 2 1/4 to 2 1/2 cups water. High altitude also requires a longer cooking time, generally. 
If the quinoa turns out too crunchy or nubby you need to up the ratio of water to grain; start by adding another 1/4 cup liquid. I prefer my quinoa soft and tender, fluffed with a fork. Note- red and black quinoa may require extra water- especially if it turns out more crunchy than fluffy.


Wednesday, June 12, 2013

Homemade Face Wash and Toner

So here's another couple of recipes that I have fallen in love with. The first is face wash. It's SUPER simple to make and my skin feels so good after I've used it. And no! My skin isn't oily after using it. Oil dissolves oil so it's great for getting out the dirty oil in your pores. And after using it I don't even need a moisturizer anymore. So here is how I make it. 
Take 1/4 cup coconut oil whip it with a mixer, I used my kitchen aid.
Then take some cold pressed caster oil and slowly stream it into your coconut oil while the mixer is running. The amount of caster oil really depends on your skin type. If you have super oily skin then you might want equal parts, but I find caster oil to be pretty drying so I just add about 1-2 tablespoons. 
After you slowly add you caster oil (you may have to scrape down the sides of the bowl) it should start to look like stiff egg whites.

Then you can add the oils of you choice and mix throughly in your mixer. Again this is up to you, but I use lavender and melaleuca. I am one of those lucky adults who still gets acne and this is a good blend of oils for that. 
When you're done mixing, put your mixture into a container. When you're ready to use this is what you do.
Apply to dry skin and throughly work it in. Take your time! Don't rush this! Then take a hot wash cloth, as hot as you can handle, and hold it on your freshly oiled face for a good minute! Enjoy this time. Breath in those amazing oils! When done just wipe off thoroughly and dry your face. Then follow with toner.


 And this is how I make the toner. I blend about 1 tablespoon lemon juice and 1 tablespoon witch hazel to a small bottle. I then add essential oils of my choice. I still just use lavender and melaleuca and sometimes add frankincense or geranium. I love the combination of the lemon juice and witch hazel and they work way better than any commercial toner I have ever used! And I know exactly what's in it and I LOVE that!
To apply just take a cotton ball or round and apply a good amount of toner to the cotton ball or round and then rub liberally on your face. I find that it has a slight tightening effect and it has also lightened quite a bit of my scarring! BONUS!!!
It's important to note that you might have to play around with these recipes to find what's just right for your skin! But thats whats great about these is it's so simple to make it work for your needs! So go try it out! You won't be sorry! 


Carpet Deodorizer

So I just made my own carpet deodorizer and it ROCKS! And it only takes a few simple ingredients. Baking Soda, Borax, and essential oils of choice! That's it! For me I went with Lavender, Eucalyptus, and Lemon. What's great about this is that not only does it deodorize but also serves as pest deterrent such as ants, spiders and dust mites.  So here's how you make it... 
Combine 1/2 cup soda, 1/2 cup and several drops of oils of your choice depending on how strong you want the scent. I did quite a few drops because I like to be able to really smell it. 
Sprinkle your mixture on your carpet and let sit for about 15 minutes and then vacuum it up! It's that simple! Now go! Clean your carpets! Your home will smell AMAZING!!!


Tuesday, June 11, 2013

Bake Sale

Last weekend the kids had a bake sale. Honey has a church activity at the end of the month and they have been encouraged to try and earn the money to buy fabric for blankets they will be making at the activity. I thought this would be a good way to make some money. Here are just some of the treats we made . . .
Jumbo Chocolate Chip Cookies
White Chocolate Chunk and Dark Chocolate Mint M & M Cookies
I happened to pick up a plethora of lemons at Costco so we had to make some goods with lemon in them.
Lemon Blueberry Muffins with a Lemon Sugar Topping

Lemon Pound Cake with a Lemon Glaze
 Here are the kids helping pit the cherries for the cherry crisps in a jar.
 Oh! And if you happen to see a pin on Pinterest where they use a straw to remove pits from cherries, let me save you some time and frustration and tell you IT DOESN'T WORK!! Chopsticks however do.  I know I have a cherry pitter somewhere, but I couldn't find it, so this is what I could come with and it worked pretty well other than the cherry stained fingers.
And here are all the goods packaged and ready to go!

 We had several advertisers. This is my brother. Ladies . . . He's available!
 I think these guys have a future as the Jamba Juice Banana advertiser! 
What do you think?

Friday, June 7, 2013

Update on the Uh-Oh Jar

So it's been a little while since we first started using the uh-oh jar and blessings jar and let me just say it's AWESOME! It's worked soooo well! I mainly started doing this for Porkchop due to some listening and whining issues he was having and this has been a great solution. The first couple days I wasn't so sure though! He wasn't quite getting it. 
He first got a slip for not cleaning his room and then whining about it. I said, "Do you want an uh-oh jar slip?" His reply was, "Sure." So he got one. It was mopping the kitchen floor. Then he whined about that so then I said, "Do you want another uh-oh jar?" To which he replied, "Sure!" 
Anyways, this continued several times until he finally realized his chores were continuing to pile up and he was missing out on outside playtime. He quietly finished his uh-oh jar slips . . . all FIVE of them, plus cleaning his room, and then went on with his day.
The next day, he again complained about cleaning his room. I said, "Do you want an Uh-Oh jar slip?" Anyone want to guess what he said?  Porkchops reply was "Sure!" So he took a slip and it was clean the kitchen floors . . . AGAIN! After his first complaint about cleaning the floors I said, "Do you want another slip?" He quickly said, "NO!" Ahhhh... SUCCESS!!! 
Since that second day, all I have to say is "do you want an uh-oh jar slip" and he quickly says "NO!" and moves on without attitude! HOORAY!!
I'm one happy momma. As for the blessings jar, I have to be honest. I haven't been as good about handing those out. That's partly because of our chore system which I will touch on later, but mainly because I'm probably more of a negative Nelly. :) I'm working on that though!

Thursday, June 6, 2013

Summer Fun

As homeschoolers we actually do school through the summer, we just keep it more low key. I like to keep them going on just some basic subjects, especially math, so that we don't have to spend a bunch of time reviewing in the fall. But we LOVE summer around here and this is the reason why . . .

Fun with cousins! Now we are pretty lucky to live close to cousins which gives us the opportunity to see cousins often, but there is something special about summer and cousins! Can't wait!

Tuesday, June 4, 2013

Back to Europe

For the last few weeks I have wanted nothing more than to sell every possession I own in order to go back to Europe. Truth be told, it's mainly for the food! But really it was an AMAZING experience and I cannot wait to go back! And this time I MUST take my hubby! And not because he whined about me being gone for so long, but because I want to show him all the things that I got to see and TASTE! Maybe I could sell an organ or two? Just kidding . . . maybe. :) In the meantime, I will just have to learn to make my own croissants, nurembergers, schnitzel, and fish and chips!

Thursday, May 30, 2013

Yummy Potato Soup

Yesterday was a rainy day and nothing sounded better than soup. I happened to have a bunch of potatoes lying around so potato soup it would be! And Pioneer Woman's Soup no less. I started by cutting the onions. If you don't have a pair of these, don't hesitate. Get some now! They are perfect for tear free onion cutting! I felt so stylish in them I continued cutting the carrots and celery with them on. Try not to be jealous!

And here is the best part of the soup. The BACON! Mmmm... LOVE ME SOME BACON!
After the bacon is cooked and you scoop it out of the pot, try not to eat it while you cook the rest of the soup. I bet you can't resist at least one piece.


 Here is my newest kitchen gadget. Costco had it on sale and I HAD to get it! It worked so well pureeing part of the soup.
And here it is! Toped with a little sour cream, bacon, cheese and green onion! I'm actually salivating as I think of it.
 And here was the true test. The kid test!
 HOORAY! WE PASSED!
 And here is the recipe. Pioneer Woman's recipe to be exact . . .

Ingredients

  • 6 slices Thin Bacon, Cut Into 1-inch Pieces
  • 1 whole Medium Onion, Diced
  • 3 whole Carrots, Scrubbed Clean And Diced
  • 3 stalks Celery, Diced
  • 6 whole Small Russet Potatoes, Peeled And Diced
  • 8 cups Low Sodium Chicken Or Vegetable Broth
  • 3 Tablespoons All-purpose Flour
  • 1 cup Milk
  • 1/2 cup Heavy Cream
  • 1/2 teaspoon Salt, More To Taste
  • Black Pepper To Taste
  • 1/2 teaspoon Cajun Spice Mix
  • 1 teaspoon Minced Fresh Parsley
  • 1 cup Grated Cheese Of Your Choice

Preparation Instructions

Add bacon pieces to a soup pot over medium heat and cook bacon until crisp and fat is rendered. Remove the bacon from the pot and set it aside. Pour off most of the grease, but do not clean the pot.
Return the hot to medium-high heat and add the onions, carrots, and celery. Stir and cook for 2 minutes or so, then add the diced potatoes. Cook for 5 minutes, seasoning with salt, pepper, and Cajun spice.
Pour in the broth and bring it to a gentle boil. Cook for 10 minutes, or until the potatoes are starting to get tender. Whisk together the flour and the milk, then pour into the soup and allow the soup to cook for another 5 minutes.
Remove half to 2/3 the soup and blend in a blender/food process until completely smooth. Pour it back into the soup pot and stir to combine. Let it heat back up as you taste for seasonings, adding more of what it needs. Stir in cream, then stir in parsley, reserving a little for garnish.
Serve in bowls garnished with parsley, grated cheese and crisp bacon pieces.


Tuesday, May 28, 2013

Pooh Sticks

Every year when we go camping it's tradition to play the game "Pooh Sticks". This game comes from the classic Winnie the Pooh and is really quite a simple game, but the kids LOVE it and look forward to it every year! And truth be told, we (mom and dad), do too! To play, all you do is find a stick. Go to a nearby bridge with a river flowing underneath it. Starting at the upside of the river, everyone drops their sticks in at the same time. You then run to the other side of the bridge to see whose stick comes out on the other side first. The first stick to show up on the other side is the winner!
So here we are doing our first round of Pooh Sticks. This was the first time that Piglet was really involved and it was a lot of fun to watch her discover the excitement of this game.
 Here they are waiting for their sticks to come out on the other side.

 And here is our winner!
 Look how excited she was! LOVE IT!
 Even Porkchop was SUPER excited!
But shortly after our first couple rounds of Pooh Sticks, Piglet found a nearby field of buttercups and had to stop to smell the flowers. 
 She's our free spirit . . . or should I say strong willed!
 These really are silly traditions, but we LOVE them and look forward to them EVERY year! I only hope that my kids don't become to "cool" for Pooh Sticks!

Saturday, May 25, 2013

A New Camera Lens

My hubby got me a new camera lens for my birthday! I have had the stock lens that came with my camera for a long time now and have wanted a nicer lens for a long while now. I am pretty happy with this little lens. It does a really great job of blurring the background when I want it to, allowing for my focal point to stand out. So here is what I did today, in no particular order. 


I'm still learning how to use it!
Blogging tips