Showing posts with label Recipes. Show all posts

Tuesday, July 2, 2013

Quinoa Fried Rice

WOW! It's been awhile since I posted last! And there is a reason and no it's not because I'm pregnant! I've been working on a couple of digital scrapbooks and so every evening when I would normally be blogging I was doing these scrapbooks! Hopefully I can get back on track though!
So yesterday for dinner we made fried rice, but in an effort to be healthier we changed what would have been brown rice to quinoa! And holy moly it was good! I was pretty skeptical because, I'll be honest, quinoa isn't my favorite thing.  But after tasting it, I didn't even miss the rice. And I'm a little embarrassed to even be posting this as a recipe because it's so super simple, but here I go anyways.
Here's what you need:
Prepared quinoa
 (if you don't know how to make quinoa I'll post how to make it at the end of this post.)
Diced Ham
Edamame, removed from pods
(traditionally you use peas, but I really like the edamame)
Green onion
Eggs
Low Sodium Soy Sauce
Garlic Paste (optional)
So here's what we did! We scrambled about 6 eggs, because thats all we had left. :) While the eggs were starting to cook we tossed in the ham bits. Mmmm.... HAM!!! Once the eggs were just about done we tossed in the edamame. When the eggs were done cooking we added our quinoa. We didn't use all the quinoa that we had previously cooked. We just added enough to get the look we were going for. I know that's super non descriptive, but sometimes thats how the cooking world works. Just so it looked like there was a good mix of quinoa to egg mixture. Then came the soy sauce. I HIGHLY recommend the low sodium variety. I find the real deal to be SUPER salty and then I am really puffy the next day. Who wants to be puffy?! Isn't that what we are trying to get rid of? The extra puff? :)
So again this is an eyeball thing. Add enough soy sauce to get the flavor you are going for. If you want you can add a little garlic paste to your soy sauce for a little added flavor. Before serving make sure to taste test it and be confident that it's just right! Once you've added the right amount of LOW SODIUM soy sauce. (did you catch that I think you should use low sodium soy sauce), garnish with sliced green onions. So there you have it folks! Super simple supper that is sure to please! Everyone in the house ate dinner tonight, including Porkchop! And that's saying something!

How to make quinoa in a rice cooker:
1. Using a fine mesh sieve rinse 1 cup of organic quinoa in cold water (unless it states on the box that you don't need to rinse).
2. Dump rinsed quinoa into your rice cooker.
3. Add 2 cups fresh water* see notes.
4. Turn on your rice cooker.
That's it. In about fifteen minutes* you'll have hot fluffy quinoa to play with.

Quinoa is rather bland on its own and loves flavor spikes.  So add herbs etc. My favorite thing to do is stir-fry cooked quinoa with various seasonings- herbs, garlic, spices, onion, etc. I add in fresh veggies and whatever else I might have on hand.


For those with out a rice cooker

Add the cup of rinsed organic quinoa to a saucepan; add 2 cups fresh water; bring to a boil, lower the heat to low; cover and simmer until cooked. Fluff with a fork.

Season while warm and use in salads or stuffing recipes, Store covered, in the fridge, for almost instant meals. Use within three days for best taste.


Notes about cooking quinoa 
Start with 2 cups water in a rice cooker. At higher altitudes, use  more water-- 2 1/4 to 2 1/2 cups water. High altitude also requires a longer cooking time, generally. 
If the quinoa turns out too crunchy or nubby you need to up the ratio of water to grain; start by adding another 1/4 cup liquid. I prefer my quinoa soft and tender, fluffed with a fork. Note- red and black quinoa may require extra water- especially if it turns out more crunchy than fluffy.


Wednesday, June 12, 2013

Homemade Face Wash and Toner

So here's another couple of recipes that I have fallen in love with. The first is face wash. It's SUPER simple to make and my skin feels so good after I've used it. And no! My skin isn't oily after using it. Oil dissolves oil so it's great for getting out the dirty oil in your pores. And after using it I don't even need a moisturizer anymore. So here is how I make it. 
Take 1/4 cup coconut oil whip it with a mixer, I used my kitchen aid.
Then take some cold pressed caster oil and slowly stream it into your coconut oil while the mixer is running. The amount of caster oil really depends on your skin type. If you have super oily skin then you might want equal parts, but I find caster oil to be pretty drying so I just add about 1-2 tablespoons. 
After you slowly add you caster oil (you may have to scrape down the sides of the bowl) it should start to look like stiff egg whites.

Then you can add the oils of you choice and mix throughly in your mixer. Again this is up to you, but I use lavender and melaleuca. I am one of those lucky adults who still gets acne and this is a good blend of oils for that. 
When you're done mixing, put your mixture into a container. When you're ready to use this is what you do.
Apply to dry skin and throughly work it in. Take your time! Don't rush this! Then take a hot wash cloth, as hot as you can handle, and hold it on your freshly oiled face for a good minute! Enjoy this time. Breath in those amazing oils! When done just wipe off thoroughly and dry your face. Then follow with toner.


 And this is how I make the toner. I blend about 1 tablespoon lemon juice and 1 tablespoon witch hazel to a small bottle. I then add essential oils of my choice. I still just use lavender and melaleuca and sometimes add frankincense or geranium. I love the combination of the lemon juice and witch hazel and they work way better than any commercial toner I have ever used! And I know exactly what's in it and I LOVE that!
To apply just take a cotton ball or round and apply a good amount of toner to the cotton ball or round and then rub liberally on your face. I find that it has a slight tightening effect and it has also lightened quite a bit of my scarring! BONUS!!!
It's important to note that you might have to play around with these recipes to find what's just right for your skin! But thats whats great about these is it's so simple to make it work for your needs! So go try it out! You won't be sorry! 


Carpet Deodorizer

So I just made my own carpet deodorizer and it ROCKS! And it only takes a few simple ingredients. Baking Soda, Borax, and essential oils of choice! That's it! For me I went with Lavender, Eucalyptus, and Lemon. What's great about this is that not only does it deodorize but also serves as pest deterrent such as ants, spiders and dust mites.  So here's how you make it... 
Combine 1/2 cup soda, 1/2 cup and several drops of oils of your choice depending on how strong you want the scent. I did quite a few drops because I like to be able to really smell it. 
Sprinkle your mixture on your carpet and let sit for about 15 minutes and then vacuum it up! It's that simple! Now go! Clean your carpets! Your home will smell AMAZING!!!


Thursday, May 30, 2013

Yummy Potato Soup

Yesterday was a rainy day and nothing sounded better than soup. I happened to have a bunch of potatoes lying around so potato soup it would be! And Pioneer Woman's Soup no less. I started by cutting the onions. If you don't have a pair of these, don't hesitate. Get some now! They are perfect for tear free onion cutting! I felt so stylish in them I continued cutting the carrots and celery with them on. Try not to be jealous!

And here is the best part of the soup. The BACON! Mmmm... LOVE ME SOME BACON!
After the bacon is cooked and you scoop it out of the pot, try not to eat it while you cook the rest of the soup. I bet you can't resist at least one piece.


 Here is my newest kitchen gadget. Costco had it on sale and I HAD to get it! It worked so well pureeing part of the soup.
And here it is! Toped with a little sour cream, bacon, cheese and green onion! I'm actually salivating as I think of it.
 And here was the true test. The kid test!
 HOORAY! WE PASSED!
 And here is the recipe. Pioneer Woman's recipe to be exact . . .

Ingredients

  • 6 slices Thin Bacon, Cut Into 1-inch Pieces
  • 1 whole Medium Onion, Diced
  • 3 whole Carrots, Scrubbed Clean And Diced
  • 3 stalks Celery, Diced
  • 6 whole Small Russet Potatoes, Peeled And Diced
  • 8 cups Low Sodium Chicken Or Vegetable Broth
  • 3 Tablespoons All-purpose Flour
  • 1 cup Milk
  • 1/2 cup Heavy Cream
  • 1/2 teaspoon Salt, More To Taste
  • Black Pepper To Taste
  • 1/2 teaspoon Cajun Spice Mix
  • 1 teaspoon Minced Fresh Parsley
  • 1 cup Grated Cheese Of Your Choice

Preparation Instructions

Add bacon pieces to a soup pot over medium heat and cook bacon until crisp and fat is rendered. Remove the bacon from the pot and set it aside. Pour off most of the grease, but do not clean the pot.
Return the hot to medium-high heat and add the onions, carrots, and celery. Stir and cook for 2 minutes or so, then add the diced potatoes. Cook for 5 minutes, seasoning with salt, pepper, and Cajun spice.
Pour in the broth and bring it to a gentle boil. Cook for 10 minutes, or until the potatoes are starting to get tender. Whisk together the flour and the milk, then pour into the soup and allow the soup to cook for another 5 minutes.
Remove half to 2/3 the soup and blend in a blender/food process until completely smooth. Pour it back into the soup pot and stir to combine. Let it heat back up as you taste for seasonings, adding more of what it needs. Stir in cream, then stir in parsley, reserving a little for garnish.
Serve in bowls garnished with parsley, grated cheese and crisp bacon pieces.


Monday, May 20, 2013

Dutch Oven Cornbread

Best Ever Cornbread
So as Memorial Weekend approaches and we are preparing for our annual "campout" I was reminded of a recipe I used last year and I never posted about it. It's this AMAZING cornbread that we did in the dutch oven. This stuff is sooooo good! It tastes like honey, but there isn't any honey it. We served it with chili and it was PERFECT! If you are looking for a low fat, low sugar recipe than turn away, because this isn't it! But once you make it, I promise, you won't be disappointed. Now we did it in the dutch oven but I'm sure you could make it in an oven as well. I'd say maybe 350 for the same amount of time should do nicely. Try it out and let me know what you think!

Best Ever Cornbread

1cup butter; melted2cups cornmeal
4eggs; beaten3cups all-purpose flour
3cups milk4tsp. baking powder
2cups sugar1tsp. salt

In a large bowl mix together butter, eggs, and milk. In a separate bowl sift together sugar, cornmeal, flour, baking powder, and salt. Mix dry ingredients into wet ingredients 1 cup at a time until well blended. Spoon cornbread mixture into a lightly greased 12" Dutch oven and spread evenly.
Cover Dutch oven and bake using 8-10 briquettes bottom and 14-16 briquettes top for 45 minutes or until cornbread turns golden brown.
NOTE: For even browning make sure to turn the oven and lid 1/4 turn in opposite directions every 10 minutes.
Serve warm with honey butter.
Serves: 10-12

*recipe found here http://papadutch.home.comcast.net/

Tuesday, May 14, 2013

Sloppy Janes

Here's a new favorite recipe of ours. It's a twist on the classic sloppy joe. Easier on the waistline by using ground turkey instead of ground beef. And don't worry you don't miss out on any flavor. Even my son ate these after sitting there for 15 mins with me trying to convince him it wasn't poisoned.  
So here you go! Super simple and Super delicious!

INGREDIENTS

  • tablespoons olive oil
  • pounds ground turkey
  • tablespoon garlic powder
  • tablespoon onion powder
  • tablespoon smoked paprika
  • Kosher salt and freshly cracked black pepper
  • cloves garlic, grated
  • green bell peppers, diced
  • large onion, finely diced
  • (28-ounce) can crushed tomatoes
  • 14 ounces tomato puree
  • cup ketchup
  • tablespoons brown sugar
  • tablespoons Dijon mustard
  • tablespoons cider vinegar
  • tablespoons Worcestershire sauce
  • 24 small potato rolls, lightly toasted


DIRECTIONS

In a large skillet, add the olive oil and ground turkey, sprinkle with the garlic powder, onion powder, paprika, salt and pepper and cook, breaking up with the back of a wooden spoon or potato masher, until the meat is no longer pink, about 5 minutes. Add the garlic, bell peppers and onions and season with salt and pepper. Cook until the vegetables soften, about 5 minutes.
Add the crushed tomatoes, tomato puree, ketchup, brown sugar, mustard, vinegar and Worcestershire sauce. Bring the mixture to a boil, reduce to a simmer and cook, stirring occasionally, until the sauce thickens up, 10 to 15 minutes. Serve warm on toasted potato rolls.(we used hamburger buns)
*recipe by Kelsey Nixon on cookingchanneltv.com

Monday, May 6, 2013

Lemon Blueberry Muffins


So the other day we were lucky to have our friends come and stay with us on their way out to go on a cruise. However, they had to leave at around 5:00 in the morning. For anyone who knows me, I DO NOT wake up that early. Not for anyone, doesn't matter who you are! I love ya, but it's just not right in my mind to be up that early! :) So in order for them to have some sort of breakfast on their way out the door in the morning I made some muffins that they could grab if they wanted. I decided to go with lemon blueberry. Mmmm....lemon and blueberry! Sooooo goooood!!!! 
I had heard or read somewhere that someone used dried blueberries in their muffins so I decided to give it a go. I ended up liking using the dry because I didn't have to be as careful folding them in so my batter wouldn't turn purple, but they still gave plenty of flavor.


So here is the recipe I went with adapted from gimmesomeoven.com
Ingredients
    Muffin Ingredients:
  • streusel topping (see ingredients below)
  • 1 1/2 cups blueberries, fresh or frozen (I used dried)
  • 2 cups + 3 Tbsp. all-purpose flour, divided
  • 1 1/2 tsp. baking powder
  • 1/2 tsp. salt
  • 1/2 cup (1 stick) unsalted butter, softened
  • 1 cup granulated sugar
  • 2 large eggs
  • 2 tsp. vanilla extract
  • 7 Tbsp. milk
  • 1 Tbsp. lemon juice
  • 1 Tbsp. loosely-packed lemon zest
  • (I added a few drops of doTerra's lemon oil to the batter as well)
  • Stresuel Topping Ingredients:
  • 2 Tbsp. melted butter, slightly cooled
  • 2 Tbsp. all-purpose flour
  • 2 Tbsp. granulated sugar
  • 1/4 cup raw sugar ( i didn't have raw sugar so I just used all granulated and I thought they turned out fine)
  • (I also added a little lemon zest to the tops fo the muffins when the came out of the oven)


Monday, April 29, 2013

Homemade Laundry Detergent

So lately I have had some inquiries into how I go about making laundry detergent. I made my first batch awhile ago and went with a liquid version. It worked really well, but I thought I would try a powder version this time. If you are interested in the liquid version here is the recipe. The ONLY reason why I decided to try a dry version was to omit the cooking step.
Here is the recipe.
  1. Grate one bar of soap with cheese grater or food processor.
  2. Put grated soap in pan with 2 quarts water and gradually heat, stirring constantly until soap is completely dissolved.
  3. Put 4.5 gallons of really hot tap water in a 5-gallon bucket (available for free in bakeries at grocery stores, just ask them) and stir in 1 cup of borax and 1 cup of washing soda until completely dissolved.
  4. Pour soap mixture from pan into 5-gallon bucket. Stir well.
  5. Cover and leave overnight.
  6. Shake or stir until smooth and pour into gallon jugs or other containers.
  7. Use 1/2 to 1 cup per load.
  8. You could add a few drops of essential oils to each container and shake well, but that is completely optional.
Now if you want to go with the dry version here is what I did. 
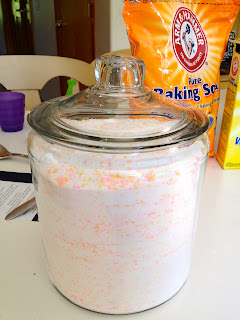
I went and gathered my materials. 1 box Borax, 1 4lb. box Baking Soda, Washing Soda, FelsNaptha, Zote, and Essential Oil for scent.

Then I pulled out the trusty food processor.

Then I put on the grater attachment and grated up the felsnaptha and zote.


After grating, plop it into a bowl.

Then fit your standard blade onto the food processor.

Dump your gratings into the processor and whip it up till the gratings look like little bright pink and yellow pearls. You could probably make this with various soaps, but I REALLY like the color pink. And the pink Zote and yellow felnaptha were only 98 cents!
Then take a small portion of your baking soda and put it into a bowl.
 Then add a bunch of essential oil to your soda and mix well, breaking up any clumps as you go. You could also use Purex scented crystals if you wanted to bump up the scent a notch.
Next, grab a HUGE bucket and dump everything in (all the soap shavings, whole box of borax, whole boxes of baking and washing soda, essential oil mixture) and get mixing. Make sure you really scrape the bottom and get all those pretty soap colors distributed evenly throughout all the powder stuff.
 After its mixed well, put your mixture into a vessel of choice. I LOVE glass containers, so that's what I went with. There wasn't enough room in this container for all of my mixture, so I put the rest in a plastic bag to store for later. 
 If doing the liquid option you might want to choose old laundry soap containers or large juice containers. 
Hopefully this has inspired you to go make your own AWESOME and INEXPENSIVE homemade laundry detergent.
When you go to do your laundry you only need 2-4 tablespoons depending on your load size and it is safe for HE machines as well as septic systems. Pretty sweet, right?!

Note: You could add oxyclean to the mix, but I think that that stuff can be kind of harsh on sensitive skin so I opted out on that stuff, but you might want the extra boost.

Sunday, April 21, 2013

April Showers Bring May Flowers

So this weekend I had the awesome privilege of making some cupcakes and cookies for a bridal shower. The theme was April Showers Bring May Flowers. The lovely brides colors are turquoise and coral so we decided to incorporate those colors as well. I decided for the cookies to make sugar cookies and I REALLY wanted to make them umbrella shaped and then have the flowers be on the cupcakes but I couldn't find an umbrella shaped cookie cutter anywhere. So I just did flowers all around. Here is how they turned out.


Isn't this table super cute! My sister and her friend decorated it! Amazing!
 And here are the cookies and cupcakes on display. The cookies were a lemon sugar cookie and are by far my favorite sugar cookie recipe I've ever made. They were still nice and soft, but still held there shape really well when baked. 
 The cupcakes were all peach. Peach cake and peach frosting. I even put little pieces of peach in them. Mmm.... I think next time I will try and add a little more peach flavor though to really send them over the top.

The cupcake recipe was adapted from tasteandtellblog.com
    Cupcakes
  • 1/3 cup vegetable oil
  • 1/2 cup sugar
  • 1 egg
  • 1 1/4 cups flour
  • 1 teaspoon baking powder
  • 1/4 teaspoon baking soda
  • 1/2 teaspoon salt
  • 1/4 cup milk
  • 1/2 cup peach jam
  • 2 medium peaches, peeled and chopped
  • 1 tablespooon flour
  • Frosting
  • 1 cup butter, softened
  • 1 teaspoon vanilla
  • 3 cups powdered sugar
  • 5 tablespoons peach jam
  • peach slices, for garnish
Instructions
  • Heat oven to 350F. Line 16 cupcake tins with liners.
  • In the bowl of a mixer, mix together the vegetable oil and sugar. Beat in the egg.
  • In another bowl, mix together the flour, baking powder, baking soda and salt. To the sugar mixture, add 1/3 of the flour mixture. Then add half of the milk. Add another 1/3 of the flour, the rest of the milk, then the remaining flour. Mix just until combined. Fold in the jam.
  • In a small bowl, combine the chopped peaches and flour. Fold into the batter. Fill the cupcake tins 2/3 full with the mixture and bake until a tester inserted in the center comes out clean, 17- 20 minutes. Cool completely.
  • To make the frosting: In the bowl of a mixer, cream together all of the ingredients. Pipe onto cooled cupcakes

The sugar cookie recipe was adapted from allrecipes.com. To the cookie batter I added the zest of one lemon and the juice of the lemon.
Ingredients
1 1/2 cups butter, softened
2 cups white sugar
4 eggs
1 teaspoon vanilla extract
5 cups all-purpose flour
2 teaspoons baking powder
1 teaspoon salt
Directions
In a large bowl, cream together butter and sugar until smooth. Beat in eggs and vanilla. 
Stir in the flour, baking powder, and salt. Cover, and chill dough for at least one hour (or overnight). Preheat oven to 400 degrees F (200 degrees C). Roll out dough on floured surface 1/4 to 1/2 inch thick. Cut into shapes with any cookie cutter. Place cookies 1 inch apart on ungreased cookie sheets.Bake 6 to 8 minutes in preheated oven. Cool completely.

For the Icing I used Martha Stewarts recipe and went with the meringue powder. I also added 
a few drops of lemon oil.

Ingredients

  • 1 box confectioners' sugar (1 pound)
  • 5 tablespoons meringue powder or 2 large egg whites

Directions

  1. In the bowl of an electric mixer fitted with the paddle attachment, combine sugar and meringue powder. 
  2. Mixing on low speed, add a scant 1/2 cup water. 
  3. For a thinner consistency, usually used for flooding, add more water. 
  4. A thicker consistency is generally used for outlining and adding details. 
  5. Mix until icing holds a ribbonlike trail on the surface of the mixture for 5 seconds when you raise the paddle.

Friday, March 22, 2013

Homemade Deodorant

O.K. First, I want to go on the record by saying that I am not a granola or a hippie or whatever else you might think I am by hearing the word homemade deodorant. I am however concerned about what is in my deodorant. I have tried more "natural" alternatives but they did NOT cut it, especially when working out. So I have been using my yucky, aluminum filled, cancer causing antiperspirant deodorant. That was until my sister in law let me try out some of her homemade stuff. I tried it last Saturday before a trip to the zoo. By the end of the day I was not smelly nor "moist"(please forgive me if that grosses some of you out).  Anyways, I thought that was pretty awesome but I also thought there was NO way it could hold up to Zumba or Hot Hula, which I do 6 days a week. But today I was brave and decided I was going to make some and give it a try.  In Zumba I stood slightly away from everyone else just in case this stuff totally failed and I started to smell like death.  But guess what?! By the end of class NO SMELL and I was less sweaty than with my regular antiperspirant!  AMAZING!!!!  So if you are interested this is how I made it. 
I used this coconut oil that currently can be found at Costco. I like it because it smells like coconut, but you can also get coconut oil that doesn't have a smell if that particular odor doesn't float your boat.

Then I used baking soda, cornstarch and these three oils . . . lavender, melaleuca, and purify.
 So here's the recipe
1/2 cup coconut oil
1/4 cup baking soda
1/4 cup cornstarch
8 drops purify
3 drops melaleuca
3 drops lavendar
To combine: take the 1/2 cup coconut oil and put it in a small saucepan. Warm it on low heat just until it melts and then turn off the heat (it won't take long). Then add the soda, cornstarch, and 3 different oils and stir to combine. Put the mixture in a small glass bowl and put in fridge or freezer to harden. I did the freezer cause I'm too impatient to wait and when I made this particular batch I was in a hurry to use it before Zumba. Once hardened either leave it in your glass bowl and just use your finger to apply a small amount under your arms or you can do like I did and use your empty deodorant container and shove the stuff in there and apply as you would normal deodorant.
This is my finished product from today and I LOVED it! Totally worth trying! Maybe I am turning granola, but don't tell my parents! :)

Blogging tips